PVS vs MCS – Part 7: Summary


As Q said in the final episode of Star Trek: The Next Generation, “All good things must come to an end” and after 6 previous blogs focusing on deciding between Provisioning Services and Machine Creation Services, it is time to end.

As I explained, over the past 5 years, improvements were made to Provisioning Services and Machine Creation Services.  While Provisioning Services simplified deployment and maintenance, Machine Creation Services improved performance and delivery capabilities.

Five years ago, if someone had to decide between the two, most likely the answer would be Provisioning Services.  But now in 2016, because of the overall improvements in both solutions, the decision will mostly focus on a few core concepts explained in the previous blogs:

Five years ago, I created a decision tree helping you select the most appropriate solution.  Developing these previous six blogs helped me do the same thing based on the latest advancements.

CompareDid I miss any criteria?  Let me know

Daniel (Follow on Twitter @djfeller)
XenApp Advanced Concept Guide
XenApp Best Practices
XenApp Videos


Advertisements

PVS vs MCS – Part 6: Architecture


This is part of a series comparing Provisioning Services and Machine Creation Services

In the previous blogs comparing PVS with MCS, I focused on functionality within each technology, but this time I’m focusing on how easy is it to manipulate.

Consider the following:

  • A single XenApp/XenDesktop (including Machine Creation Services) architecture can span multiple geographical sites.
  • A single Provisioning Services architecture can span multiple geographical sites.

However, having a single XenApp/XenDesktop/Provisioning Services farm span across multiple geographical sites might not always be the correct architecture.

Imagine you have two major data centers, each hosting virtual desktops/apps.  You have XenApp and XenDesktop hosts in each data center.  Do you define zones for each data center and implement a single XenApp/XenDesktop environment or do you deploy two environments: one for each data center?

The correct answer is based on the unique characteristics of the organization and their risk tolerance. Risk sensitive organizations will want to reduce the size of their failure domain, resulting in two separate environments. If there is a catastrophic failure, it only impacts a portion of the environment.

If you follow this path, you need to devise a plan on how to replicate the master images between sites.

  • With Machine Creation Services, the admin must work in the hypervisor and export/import the master image  to the different sites and resource pools.
  • With Provisioning Services, the admin simply copies the image file to the other site. In fact, this is the same process many Provisioning Services admins already use to keep images synchronized across multiple servers. And to streamline this process, many admins create simple scripts to copy images when changes are detected.

Even though it is possible to keep images synchronized across multiple sites if you are using Machine Creation Services or Provisioning Services, I believe the simplicity of copying Provisioning Services image files gives it an edge for this criteria.

Sites

Daniel (Follow on Twitter @djfeller)
XenApp Advanced Concept Guide
XenApp Best Practices
XenApp Videos

PVS vs MCS – Part 5: On-Going Maintenance


This is part of a series comparing Provisioning Services and Machine Creation Services

Deploying Machine Creation Services is extremely easy as there is nothing to deploy.

Deploying Provisioning Services is easier with Hyper-V Gen2 VM support and the single-stage Boot Device Manager.

This sounds great, but what about on-going maintenance?  (something many fail to consider)

Overall, the update process for both imaging technologies are simple to perform through the respective consoles.  However, with Provisioning Services, there have historically been some special considerations in order to update the Boot Device Manager file as well as updating the Provisioning Services Agent that we must take into account.

Boot Device Manager

If you assign the BDM file to each virtual machine, you need to ask yourself how you update the file if your Provisioning Services infrastructure changes?

Before the XenApp and XenDesktop 7.9 release, this often meant the admin must update each virtual machine. This is not a very good admin experience.  That experience drastically changed.

With three clicks of the mouse totaling about 15 seconds of time, the admin can update all target devices with an updated BDM file.

BDM Update

Provisioning Services Agent Update

Next, we have to concern ourselves with updating the Provisioning Services Agent contained within our master image file.  Unfortunately, treating an agent update like any other update to the image would result in a non-responsive system.

To utilize a PVS image, the virtual machine requires a constant network connection, but updating the PVS agent will result in the network going offline as the network drivers are updated.  Once the network drops, the VM can no longer function and the update never completes.

Historically, this process meant we had to do a process called reverse imaging where we take the network-streamed image file and rebuild a traditional virtual machine based on storage. This removed the constant network connection requirement, and allows the admin to update the agent successfully.

Although reverse imaging does work, it isn’t a very efficient admin experience for updating the PVS Agent. In the 7.9 release, the admin experience changed.

With 7.9, updating the PVS agent follows the same process as other updates. Look at how updating the PVS agent has changed over the past few PVS releases, taken from docs.citrix.com.

Updates

The image is too small to read the details, but look at the differences in the length of this process. The number of steps in this process has quickly decreased from multiple pages to just 2 lines.

Image Life Cycle

Certain organizations require image updates to go through multiple user acceptance testing deployment stages of

  • Development: Phase for the admin to make the necessary changes to the image
  • Test: Deployment to a small group of users to validate implemented changes
  • Production: Deployment too all users

The entire process should be accomplished without impacting the current production users.

Machine Creation Services image life cycle focuses on Development and Production.

Provisioning Services image life cycle focuses on Development, Test and Production.

Fast Image Update/Rollback

In addition to the image life cycle process, certain organizations require the ability to quickly roll out new updates and instantaneously rollback to a previous version. Unfortunately, mistakes will be made in an image update potentially resulting in issues for the users, requiring the admin to roll back to a previous version until the issue can be resolved.

If the issue impacts a mission critical component for the organization, the admin will need to roll back as fast as possible.

Machine Creation Services can roll out new image updates and rollback to previous versions. However, this process, is not instantaneous as a new version of the image must get cloned from the correct VM snapshot. The cloning process can take some time to complete.  The speed of this process is based on the underlying storage subsystem as well as any optimizations utilized within the hypervisors (VAAI/ODX as examples).

Provisioning Services, on the other hand, is able to rollout/rollback changes in the time it takes to reboot the virtual machines by using the vDisk version wizard.

Summary

So where does that leave us in the Machine Creation Services and Provisioning Services comparison?

UpdatesProvisioning Services does edge out Machine Creation Services with the ability to instantaneously update/rollback images and having a more traditional life cycle process focusing on development, test and production phases.

Daniel (Follow on Twitter @djfeller)
XenApp Advanced Concept Guide
XenApp Best Practices
XenApp Videos

PVS vs MCS – Part 4: Deployment


This is part of a series comparing Provisioning Services and Machine Creation Services

So far, the latest analysis between Machine Creation Services and Provisioning Services included within XenApp and XenDesktop 7.9 has only focused on how Machine Creation Services has improved, but what about Provisioning Services?  Has anything been improved?

Most definitely! Especially around simplifying the deployment of Provisioning Services.

Hyper-V

Previously, Provisioning Services supported Hyper-V, or to be more specific, with generation 1 Hyper-V virtual machines. However, generation 1 Hyper-V virtual machines do not support PXE boot unless the VM utilizes the legacy network adapter.  Unfortunately, the legacy network adapter is not as efficient as the standard (synthetic) network adapter.

To get Provisioning Services to work with Hyper-V while taking advantage of the optimized synthetic network adapter, each virtual machine would require two separate network adapters. This configuration gets confusing, including the use of multiple IP addresses.

With the XenApp and XenDesktop 7.9 release, Provisioning Services supports Hyper-V generation 2 virtual machines.  And unlike generation 1 VMs, generation 2 VMs support PXE booting with the standard (synthetic) network adapter.

Now, each virtual machine only requires a single NIC. This is a huge improvement in simplicity.

Boot Options

Booting a PVS target device is easy in a lab environment where you have total control over DHCP and can easily set DHCP options 66 and 67 to the Provisioning Services TFTP server and boot file. But when we move into production, the network team is rarely as accommodating.

This led many of us to deploy the Boot Device Manager (BDM), which is a small boot file deployed as an .ISO file and attached to each target device. This worked great as we no longer required the configuration of those pesky DHCP options.

However, the BDM file was considered a 2-stage boot process because even though this BDM file contained the boot image, it did not contain the Provisioning Services boot drivers needed to complete the process and sign into the Provisioning Services server.  This meant we still needed a TFTP server. It meant we still needed TFTP IP helpers if we spanned multiple subnets.

Did you know that the BDM file was improved. It is now a single-stage BDM file. The ISO file attached to the target machines contains the boot file and the Provisioning Services boot drivers, eliminating the need for the Provisioning Services TFPT server.

Again, simplifying initial deployment.

So where does that leave us in the Machine Creation Services and Provisioning Services comparison.

SimpleI consider it to be even. Although Provisioning Services requires us to install the Provisioning Services server, the process is straight forward.  The complexity with Provisioning Services deployment was for Hyper-V environments and setting up the DHCP/TFTP options.

With the support for Gen 2 virtual machines on Hyper-V and a single stage boot device manager, the world of Provisioning Services is much easier to deploy.

Daniel (Follow on Twitter @djfeller)
XenApp Advanced Concept Guide
XenApp Best Practices
XenApp Videos

Machine Creation Services RAM Cache and XenServer IntelliCache


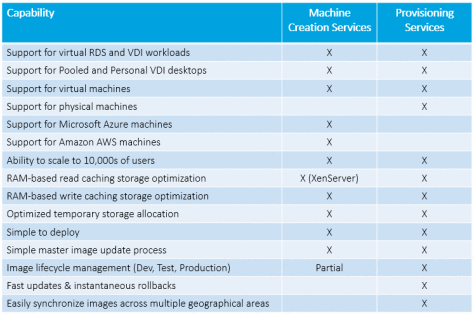
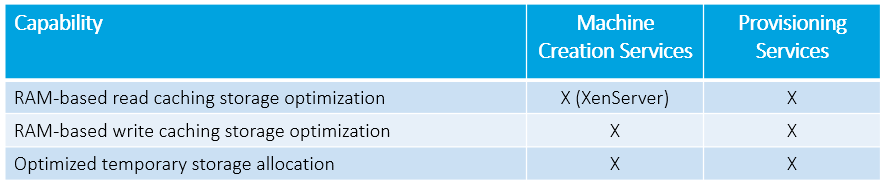
As I was discussing the storage optimization capabilities in the Machine Creation Services vs Provisioning Services debate, I mentioned the use of a XenServer RAM-based read cache. This can be misunderstood as XenServer IntelliCache (a mistake I’m sad to say I’ve made in the past).

XenServer IntelliCache (released with XenServer 5.6 SP1) and XenServer RAM Cache (released with XenServer 6.5) are two different capabilities of XenServer, both of which tries to reduce the  IO impact on shared storage.

Let’s walk through different deployment scenarios with Machine Creation Services in XenApp and XenDesktop 7.9.

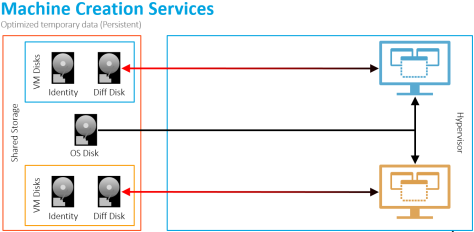
Scenario 1: Shared Storage on any Hypervisor

When defining a host connection, the default storage management option is to use shared storage.

Default
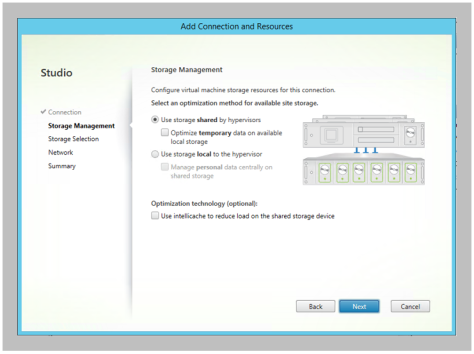
This configuration results in the following architecture

Default Storage

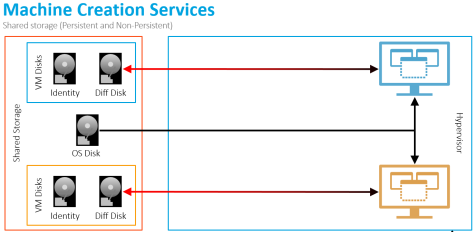
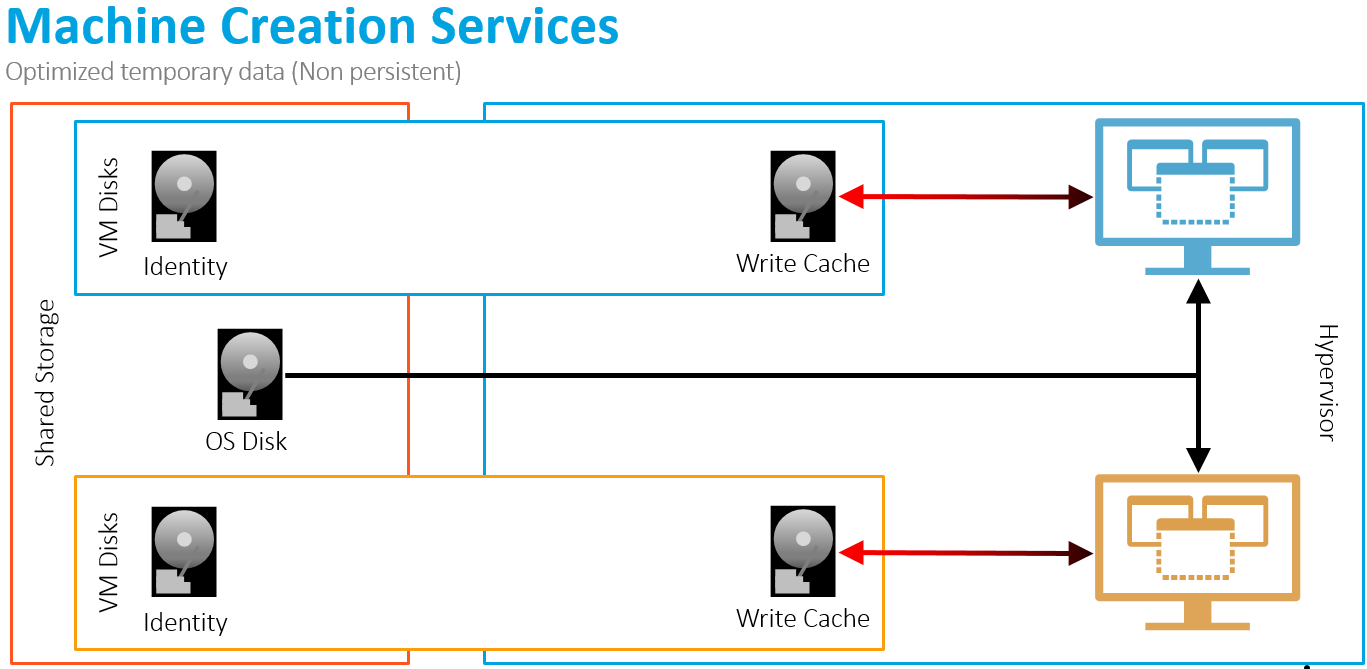
The virtual machines read (denoted by the black lines) from the master OS disk on shared storage. Writes (denoted with the red lines) from the virtual machine are captured in the differencing disk, located on the same shared storage as the master OS disk.

It is also important to note that there will also be reads coming from the virtual machine’s differencing disk back to the VM.

Scenario 2: Shared Storage with Optimized Temp Data on any Hypervisor

With XenApp and XenDesktop 7.9, admins, when creating their host connection configuration, can select the “Optimize temporary data on available local storage” option.

Storage Config
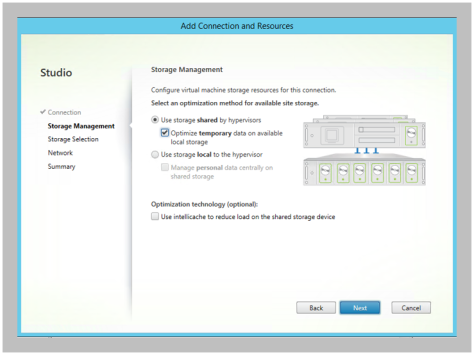
Selecting this option results in the following changes to the architecture:

Opt Storage

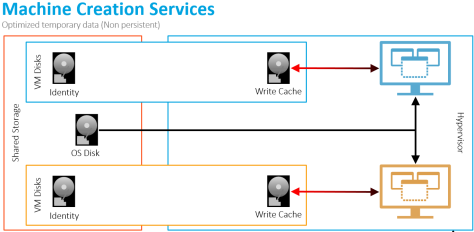
For non-persistent desktops, instead of the temporary writes going into the shared storage differencing disk, the writes are now captured within the write cache disk on the local hypervisor storage.

Persist optBut for persistent desktops, the optimize temporary data setting is not used as all data is permanent. The writes are captured on shared storage within the differencing disk.

The value is that we don’t waste shared storage performance with data we don’t care about. We instead shift the storage IO to local, inexpensive disks.

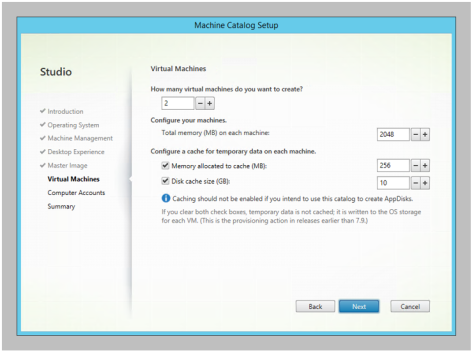
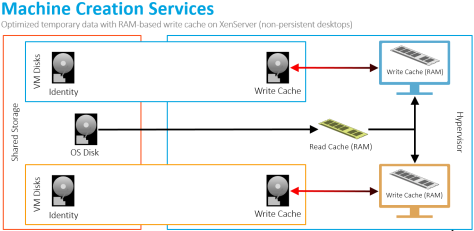
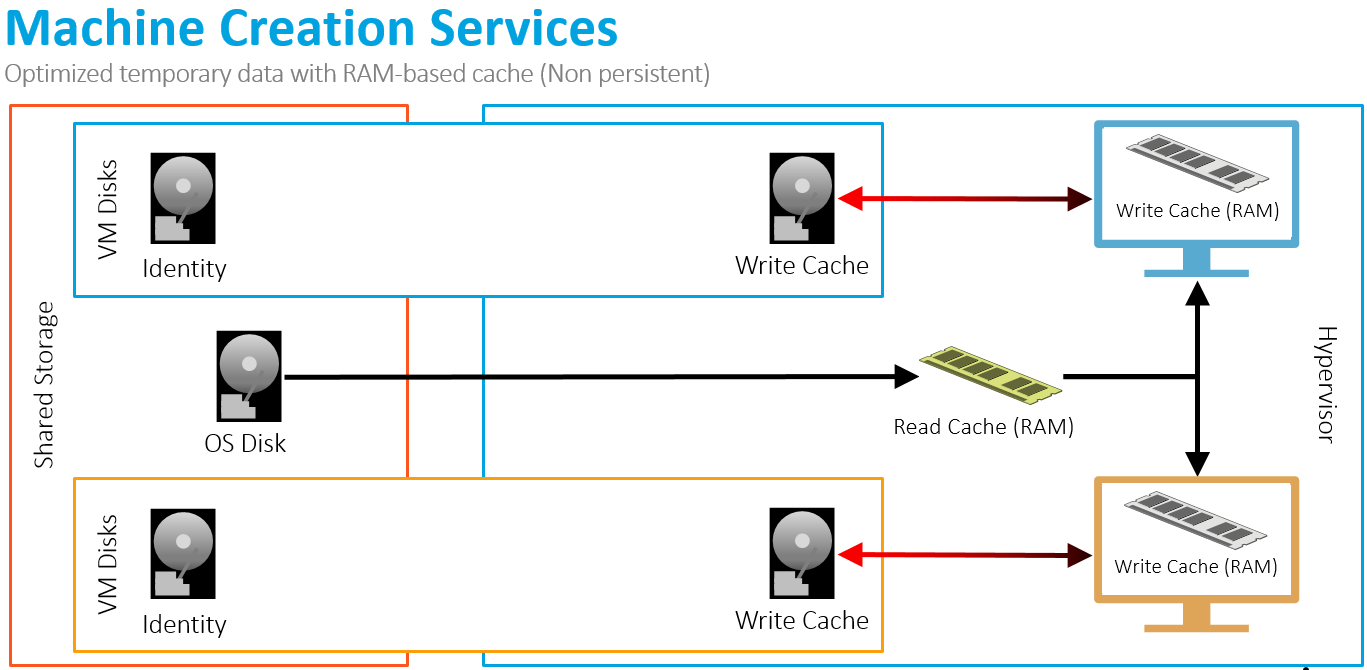
Scenario 3: Shared Storage with Optimized Temp Data and RAM Caching on any Hypervisor

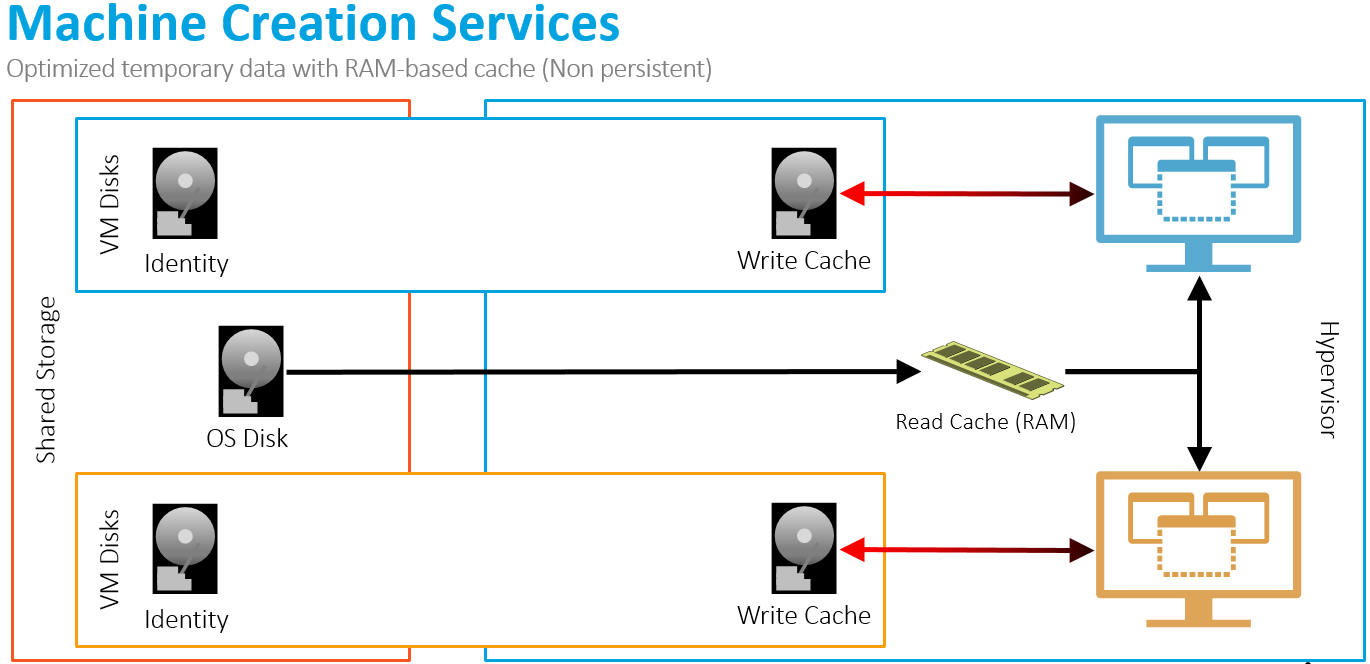
With XenApp and XenDesktop 7.9, a portion of the virtual machine’s RAM can be used to cache disk writes in order to reduce the impact on local/shared storage. During the creation of a new machine catalog, an admin defines the size of the RAM and disk cache.

CacheThe RAM cache operation adjusts the architecture as follows

mcs cacheFor non-persistent desktops with a RAM-based write cache on a non-persistent desktop, the writes first go into the non-paged pool portion of RAM within the VM. As the RAM cache is consumed, the oldest data is written to the temporary disk-based write cache.

However, this option is not applicable for persistent desktops due to the risk of data loss. If disk writes are cached in volatile RAM and the host fails, those writes will be lost, potentially resulting in lost data and corruption.

For non-persistent desktops, when used in combination with optimizing temporary data, we not only shift our write performance to low-cost local disks, but we also reduce the amount of write IO activity going to those disks.  This should further help reduce the costs by not requiring the use of local SSDs.

Scenario 4: Shared Storage with Optimized Temp Data and RAM Caching on Citrix XenServer

If the environment is deployed on Citrix XenServer, the architecture automatically includes a RAM-based read cache on each host.

Non-persistent on XenServer

Persistent desktop
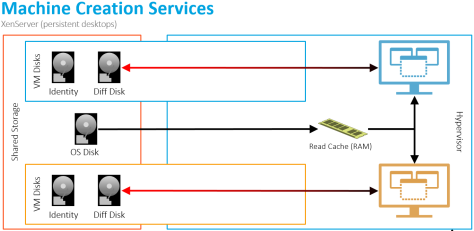
For both, non-persistent and persistent desktops, portions of the master OS image is cached within the XenServer’s Dom0 RAM so subsequent requests are retrieved from the local RAM instead of generating read IOPS on shared storage.

This is valuable because we significantly reduce the master image reads from our shared storage. If you have 50 XenServer hosts, with each running 100 Windows 10 virtual machines, each virtual machine will read the same data from the same master image. This will add significant amounts of read IO activity on shared storage. By caching the reads in local RAM for each XenServer host, we can drastically reduce our impact on shared storage.

We also have a RAM-based read cache in Provisioning Services.  This capability increased boot performance by 4X.  I would expect to see similar results with this XenServer feature.

Scenario 5: Shared Storage with Optimized Temp Data and RAM Caching on Citrix XenServer with XenServer IntelliCache

When the admin defines the host connection properties, Studio includes the IntelliCache option if the host connection is XenServer.

XS ICFor non-persistent and persistent desktops, a local, disk-based cache of the master OS image is captured on each XenServer host, reducing read IOPS from shared storage. As items are accessed, they are placed within XenServer’s RAM-based cache.

The write operations are different based on whether the desktop is non-persistent or persistent.

Non-persistent with IntelliCache
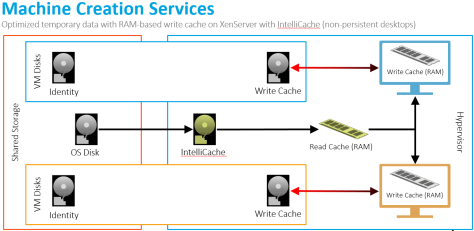
For non-persistent, disk writes are first captured in the VM’s RAM cache. When the RAM cache is consumed, the oldest content is written to the local write cache.

Persistent with IntelliCache
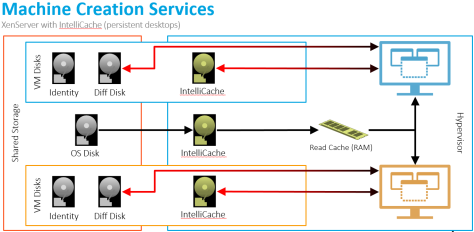
For persistent desktops, disk writes are simultaneously captured in the local IntelliCache disk (.VHDCache file in /var/run/sr-mount) and in the shared storage differencing disk. When the VM reads data from disk, it first checks the local IntelliCache disk and then the shared storage differencing disk.

The value for this configuration is two-fold:

  1. Host-based IntelliCache Disk: Using IntelliCache with the Read Cache (RAM) provides us with two levels of caching on XenServer.  This could help reduce reads from shared storage in situations where our Read Cache (RAM) is not large enough.  Imagine if we have multiple images being delivered to each XenServer host. Our read cache (RAM) will not be large enough, resulting in increase read IO activity on shared storage. By combining the two, we should be able to keep shared storage Read IO activity to a minimum.
  2. VM-Based IntelliCache Disk: For persistent desktops, even though each write is performed twice (local IntelliCache disk and differencing disk on shared storage), the reads will come from the local IntelliCache disk, thus helping to reduce the load to shared storage. How much will this help the user experience and cost?  That is still to be determined.

Daniel (Follow on Twitter @djfeller)
XenApp Advanced Concept Guide
XenApp Best Practices
XenApp Videos

PVS vs. MCS – Part 3: Storage Optimization


This is part of a series comparing Provisioning Services and Machine Creation Services


For years, storage optimization has been one of the major strengths of Provisioning Services. With PVS, we can do the following:

  1. Optimized temporary storage allocation: PVS allows us to store the read-only master image on local or shared storage. We can also decide where to place the temporary, write disk, which could be on the PVS server’s local storage, the hypervisor local storage, the hypervisor shared storage, within the virtual machine’s RAM, or a combination of RAM and hypervisor local storage.
  2. Read IOPS Optimization: By automatically utilizing Windows 2012R2 system cache, we can drastically reduce read IOPS from the master image.       This has been shown to drastically decrease VM boot time.
  3. Write IOPS Optimization: By utilizing a combination of RAM and local storage for the write cache, PVS can significantly reduce write IOPS going to the hypervisor’s storage. This helps reduce costs as well as improve the user experience.

The write IOPS optimizations are powerful for any deployment because of the impact it has on the user experience while helping to reduce the cost of VDI storage.

But where does this leave Machine Creation Services?

If you believe Machine Creation Services is severely lacking in these capabilities, the latest release might surprise you.

Storage Location

Historically, Machine Creation Services utilized a differencing disk to store the writes. One limitation with the differencing disk approach was that the disk must reside on the same storage as the master image.

Default StorageIf you used shared storage to host your master images, you were also required to place all of your writes on the shared storage. This can drive up your costs.

With the 7.9 release of XenApp and XenDesktop, the differencing disk is transformed into a write-backed cache disk. This transformation allows the writes to be separated from the master image storage location.

Opt StorageWhen shared storage is used for the master image, the temporary storage (writes) can then be stored on the hypervisor local storage. This is configured as part of the host connection configuration within Citrix Studio.

Storage ConfigRead IOPS Optimization

Even though the writes are stored locally on the hypervisor, shared storage is still used for Read IOPS as each virtual machine on each hypervisor must read from the same set of images on shared storage.

Remember that PVS utilizes a RAM-based read cache to reduce Read IOPS from storage; when using XenServer, Machine Creation Services implements similar functionality.

RAM Read CacheA portion of XenServer RAM is used to locally cache portions of the master OS disk.

Write IOPS Optimization

I believe the Write IOPS optimization is the biggest enhancement for Machine Creation Services because of the impact the similar write IOPS optimization technology had on Provisioning Services with respect to storage cost and user experience.

With Machine Creation Services, each virtual machine utilizes a portion of their non-paged pool memory for the Machine Creation Services RAM cache.

As the virtual machine begins writing data to disk, those operations are stored within the RAM cache. Eventually, the RAM cache will get consumed and the oldest cached data will be written to the write-backed disk cache in 2 MB blocks.

This process is similar to how Provisioning Services handles the RAM-based write cache with disk overflow, which significantly reduced write IOPS.

XenApp and XenDesktop 7.9 gives enhances Machine Creation Services with

  1. Optimized temporary storage allocation
  2. RAM-based Read IOPS optimization
  3. RAM-Based Write IOPS optimization

So in the comparison of PVS and MCS, where does that leave us now?

Again, things are fairly even.

Daniel (Follow on Twitter @djfeller)
XenApp Advanced Concept Guide
XenApp Best Practices
XenApp Videos